00:00
00:00
churasko
If a game comes out and no one is around to play it, does it make a sound?

Joined on 10/14/21

Level:
19
Exp Points:
3,746 / 4,010
Exp Rank:
15,255
Vote Power:
6.08 votes
Art Scouts
2
Rank:
Civilian
Global Rank:
> 100,000
Blams:
0
Saves:
8
B/P Bonus:
0%
Whistle:
Normal
Medals:
5

churasko's News

Posted by churasko - 2 weeks ago


iu_1390406_9920283.gif

studding art theory can be hard, at least for me it is: I am dense and stupid. Although I can apply a concept properly I feel this urge to understand it because the need for jumps in logic drives me insane. With when studding art theory this becomes a problem


If they are to specific in their explanation of why you have to do a thing I end up not applying it if I don't agree with that specific explanation (dense) or the way it doesn't work with out a jumps in logic (stupid)


if they are deliberately vague OR WORSE they say "is SubJeCTive :))), u ll known when it fells right" NO I CANT, THATS WHY I READING YOUR BOOK !!! >:/


so what I am trying to do about it?:


applying Semiotic Theory?


what is?

is the systematic study of sign / processes and the communication of meaning

&

a sign is defined as anything that communicates intentional and unintentional meaning or feelings to the sign's interpreter.


how does it work?

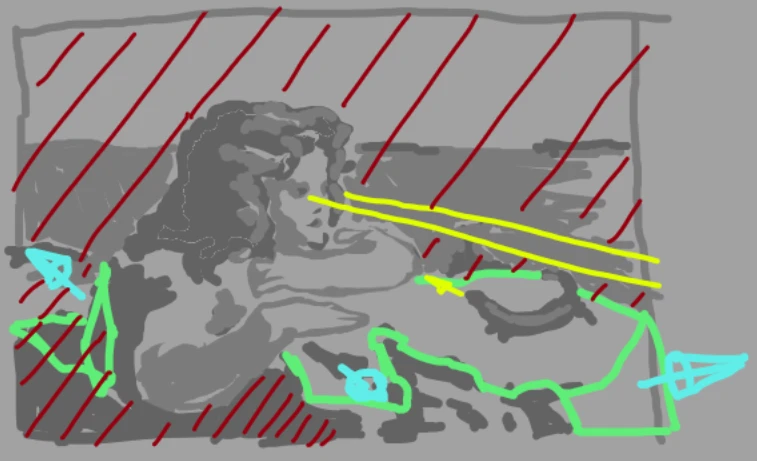
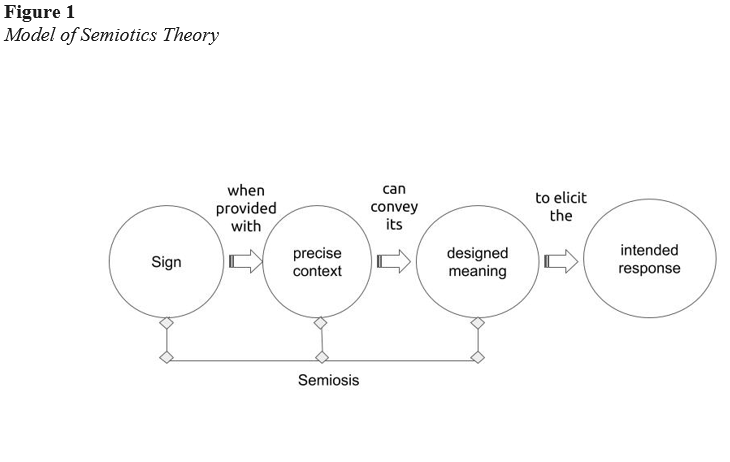
I don't want to do the same thing that I am complaining about at the end I ll leave some homework but with the Wikipedia description from before and this graft u ll think u might get the gist of it:

iu_1390350_9920283.png


Why is cool to apply it here?


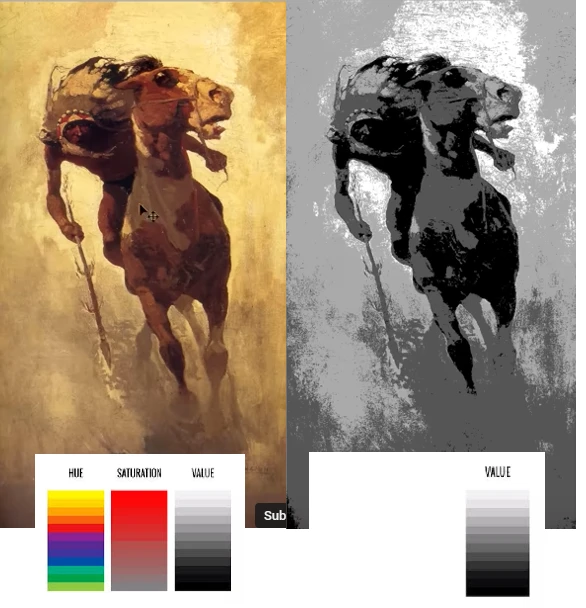
when applying semiotic u can abstract the subject of the study enough to get to the **intend** of the theory, to give it a meaning, witch shift things around: it no longer matter if the theory it is wrong of right. Now the goal is to find the right intentions for what u want to accomplish and the theory is there to achieve that intend


for example: your composition is no longer wrong or right coss it fails in x or y, your composition can be wrong or right coss it is not doing what u had in main for your drawing.


conclusion:

this seems to be a healthier way to approach studding this stuff, it is difficult to vocalize what u have internalize and saying wrong stuff is spooky. Using semiotic helps me to take the feeling of being wrong all the time and stuff not felling right and makes it in to this is not doing what it wanted it to do, how can I stare it back in to the right intend/meaning.

It also helps with the felling of not seeing the full picture, if a theory is wrong as long as the intend works the drawing can end up looking good since every element is relative to each other (objective vs subjective criticism and all of that )


sources:

most of this I made it the fuck up, but the real stuff is here if u want to read more:

https://en.wikipedia.org/wiki/Semiotics

https://www.youtube.com/watch?v=SlpOaY-_HMk

https://opentext.wsu.edu/theoreticalmodelsforteachingandresearch/chapter/semiotic-theory/


Tags:

1

Posted by churasko - 3 weeks ago


Animation

a lot of programs do image editing, texturing, drawing, etc but the main thing that kept me in Clip

studio is that the animation system are easy to use. For example, if u want to make a dum gif of a

drawing I can just extend the animation timeline in the workspace menus and start making an

animation with the possibility of adding sound effects and match more

having the same tools for drawing and animation is so goooooood

iu_1389126_9920283.webp

if u known animation terms most of the timeline settings are self explanatory

iu_1389127_9920283.png

timeline modifiers/entities/modes

(again all of this is my interpretation i know I am making a lot of assumptions here, the names and

definition can and will be wrong, pls don't kill me :/)


header

the vertical red line is the header, this is what's is currently being display

onion skin

this displays a color silhouette of the last/next frame u can configure it in the animation settings

play mode

there is a stop line (u set it up with the playback time but u also can also drag it out manually after the

settings) everything between the starting line and the stop one is in the video. If u enable loop mode

the video will start again once finish


timeline elements

it reminded me of the flash 8 animator (I was so long ago that i cant remember a thing about flash

outside of basics) the mayor change is that you need to keep a folder structure for your photograms

iu_1389129_9920283.png


clip

those horizontal gray lines are called clips by the program, the space that they are on is supposed to

be a folder in the time line and each cel in them represent 1 frame according to your specification in

the time line settings. The clips can be split so any transforms or properties aren't share between

them, if a clip is empty it means that is not visible in that frame.


cels

this are the current assigned layer to be visible of that respective clip/folder, if in cel mode, the name

of the layer should be visible otherwise they appear as those little triangles at the bottom of the clip.


cel controls:

1. new animation folder: creates a new layer folder

2. new animation cel: creates a new layer inside the current frame/clip/folder

3. specify cels: lets u pick the current cell of the frame/clip

4. delete specified cels: lets u clear the current cel of the frame/clip


keyframes

this need to be enabled

iu_1389128_9920283.png

these are the current transform value of a given cel at that frame in the timeline, if the keyframes are

enable in that clip the program interpolates the changes in values in frames


keyframe controls:

5. disable keyframe editing: disables the use of keyframes in the current clip

6. Layer Mask I don't know :/ i cant remember

7. deletes the current keyframe

8. creates a keyframe and it lets u decide the interpolation


this enables u to change all the values of the cel

iu_1389130_9920283.webp

u cant modify cel values once keyframe mode is enable u need to disable it for any cel changes and

that is ...


the FUKING KEYFRAME system

using keyframes complicates the timeline a little, since there is no base transforms values for clips any

changes are drag along to the next clip, witch at a certain point makes it difficult to center images, that

why u need the good practice of splitting the clips at the start so there is a beginning mid an end

coos the interpolation is automatic once enabled.

this is annoying + the fact that u can t animate the howl scene in one go means that u need to

have a separate workflow for the movement and drawing of a cel since the transform changes

aren't track in cel mode making it SO TEDIOUS ++++ the onion skin doesn't do keyframes

neither reeeeeeeee


the 2D camera

the camera is just a clip/folder that's always in keyframes, in the the viewer appears as a blue

rectangle, everything outside of it isn't in the frame.

Having the camera work inside of the cel structure fells so good, any element outside of the camera

isn't affected by its movement also there ARE onion skins for the camera movement

iu_1389131_9920283.png


After delaying escaping windows for so long I decided

to finally do it, for that, I need to escape Clip studio. I

love Clip studio but I don't like the Linux port


I been putting off the change coss I always gaslight

myself in to believing that the other programs are too

different and are a pain to adapt to


the next steep is to turn this in to a check list and start

adjusting one check at a time


Tags:

1

Posted by churasko - 3 weeks ago


Why did I fell in love with clip studio?


I really didn't use that many fancy toys anyway so I think if I wont be using it any more I should tally up what it was good for, as a base line any future drawing program ( ps: since u can code plugins and is open source I had been rly interested in contributing to Krita for a while)


this is my CLIP studio

there are many others but this one is mine


iu_1389103_9920283.webp


# bare necessities

I like programs as close as default settings as possible so no changes there outside of the memory usage, this is the template I use the most


iu_1389104_9920283.png


# my settings tab

I m writing them down so I can look for the shortcuts or lack there off once I change


## Export settings

iu_1389105_9920283.png

I never had to use any other program/plugin beside the occasional video editor for final passes. The

export options are great, the png and jpg options never crashed the program unlike others and nether

did for exporting multiple files / animations( I only did mp4s and gifs) the only program that I used that

was this user friendly was aseprite

iu_1389106_9920283.png

(for exporting 2D sprites this works great)


Edit settings

iu_1389108_9920283.webp


the * means that they are mostly use in shortcuts or outside of the tab


Change color of line to drawing/convert to drawing color


makes anything selected that's not transparent in to the current picked color


Hue/Saturation/Luminosity

" ctrl + U "

this sliders help a lot when fixing color / editing photos

iu_1389107_9920283.png

Transform

" ctrl + T "

I have the keyboard shortcut burn in to my memory by now. Cant remember if the other programs

work the same as this one but I am writing it down anyway.

iu_1389109_9920283.png

If nothing is selected the transform just gabs the current selected layer/layers lets u transform its

properties and move it around :

iu_1389110_9920283.png

and the most important part is that once its done (pressing ok | enter) it goes back to the tool u

had before the transform


ps:


if u hold shift while moving the selected object, the movement gets anchored to the x or y axis


Change canvas Size


I was use to input the changes with out a visualization of how it ll look, the canvas size lets u

freehand it, this is comfy for photo bashing and edits that always en up using more space


iu_1389111_9920283.png


Select settings


Color Gamut

This is just from time to time to pick a color from the image

iu_1389112_9920283.png

selection tools legend

THIS IS SOOOO COOOL, once u are done selecting, the legend appears with the stuff that u most

commonly use when doing so. This makes so many of the tools there obsolete since its so fast just to

use the context menu

(at least to me, my rpm is terrible put I can still pull a 21 population archer rush in a good day)

iu_1389113_9920283.png


Filter settings

iu_1389115_9920283.png

I mainly use it to apply the motion and gaussian blur and to render the perlin noise


Workspace menus:

layer system

this is the standard with color coding witch helps a lot when animating

iu_1389114_9920283.png


the Navigator

using this to move in a zoom out drawing is a must for me now

iu_1389116_9920283.png


tools... are fine in most programs, this is more about brushes


I m pretty sure that u can just import photoshop brushes to clip studio. This are most of the ones I kept

but I just use 3 or 4


stabilization


I might be using a lot of stabilization , in clip studio there isn't almost any input lag while doing so.


I end up going in between 6 and 10


lock


This is a cool feature, it keep the values as default so it resets any other modification not lock before

changing brushes


iu_1389117_9920283.png

1. one or two with no pressure for line art/ edits/ painting the only difference is that one look cleaner

than the other


2. one textured one with pressure for size but no for roughness, that doesn't mix in the first stroke

with itself but it does when u start another stroke:

iu_1389119_9920283.png

3. one oil one with pressure and roughness for mixing color

iu_1389120_9920283.png

4. and one for "line art" with pressure and roughness but no color mixing

iu_1389121_9920283.png

if I can help it I try to use the same size of brush when doing lines but it seems like the program adjust

the size to the zoom? I don't know :/

iu_1389122_9920283.png


Day dreaming

I used Paint Tool SAI for so many years, then I changed to photoshop CC 2019 for some months until

I ended up in CLIP studio for the better animation timeline (if i recall correctly the single layer

animation in photoshop was super good but the multiple one gave me some issues)

from SAI to photoshop I only lost my brushes but photoshop had that super feature that I used to love.

When u hold shift the cursors anchors to an x or y axis and it lets u draw a straight line.


THIS WAS AWESOME, for delimiting boundaries, making quick edits and mainly not having to use a

line/shape tool for quick stuff that doesn't need to look perfect:

iu_1389123_9920283.png

SEEEE?


This might have spoil me a little bit. in CLIP studio there is something similar: it saves the last location

where the brush was used and lets u create a line from there, this might be more convenient and

useful but the photoshop way felt so GOOOD


I MUST get that feature, if it exist i ll need it if it doesn't i ll code it myself if I had to


Tags:

1

Posted by churasko - 1 month ago


hi!

Its been so long since I last drawn anything and I wanted to make the 100 and 1 time starting to draw from 0 in to a fun series of post ( its more for me coss I always said I ll gonna do it but I never type nothing :/ )


I m going to start from 0, fuck clip studio and the crashes that corrupt 5 minutes of animation, fuck photoshop and its ram munching we going in to Krita.


How do u guys study composition?

After reading lots of books and stuff I came to the conclusion that paintings/drawings are composed by 2 parts:


the negative and positive spaces

iu_1388519_9920283.webp


the negative space according to Wikipedia is empty space around and between the subject(s), not the subject itself, forms an interesting or artistically relevant shape so to me its that the spaces are the separation of artistically relevant shapes in a image/idea/scene


the tone/value map:

iu_1388520_9920283.webp


shapes in an image/idea/scene aren't always delimited by lines or color, but they seem to be delimited by the difference in value/tone of the color (this is not directly the light of the scene, it can be but there are more factors in it) and the panther made by the grouping of those values/tone


One influences the other, the tone map need the space to delimitate shapes and forms of its values and the space needs the value to segregate the content of an image/idea/scene in to spaces

This might not be right but I like to see it this way :)


it seems that we prefer those artistically relevant shapes or at least that could be one way to interpret the Law of Pragnanz. Assuming that s right then we can say that grouping shapes in a meaningful way lead to a more interesting composition.


In practice?

(I m dum ://// and i been doing homework on it for a while, but i never seem to get a nice grasp on it)


I saw this in a book shop the other day and wanted to do a "study":


The Girl with the Lizard (1884)

[Ernst Stückelberg](https://artvee.com/artist/ernst-stuckelberg/)

iu_1388521_9920283.webp

first the black lines as the main focal points

(i know the it ugly, I use the gray lines to delimit the main separation of tones and patterns inside of the spaces and the black lines to delimit the negative and positive space in the frame)


At a fist glance I took the girl and the lizard as the main focal points of the painting but the negative space didn't seem right :

iu_1388522_9920283.png

Then I saw the side of the rock and the girl not looking directly at the lizard and got the impression that this was like a photo took rly close to the girl as if the camera was focus on the surface of the rock where the girl is resting her hand


So I join the rock and the negative space made more sense, there are 3 layers of "focus" the main one, the near one an the background if i do that:

iu_1388523_9920283.webp


ps: the framing

I cant put my finger on it but the framing is interesting, from what I can remember in most places they tell u that your goal is to keep the eyes of the viewer inside of the frame but to me, most element of the painting imply that this is a part of a bigger picture, the girl looking away, the reflection of the sun the focal point so near the edge. I don't know, i like how it looks 


the tone/value map

since the shapes of a drawing are compose of patterns and values, I like to make a tone map after delimiting the spaces in the drawing (this way its easier to merge shapes, the Law of Pragnanz and all of that dark magic stuff):


iu_1388524_9920283.png


Sooo, what can I take away from this?


so not guiding the eyes outside of the framing isn't always bad?

If it is deliberately made, it seems like it could work. Although I m too dense to parce what the dude wanted to say with the way the painting is frame the intend seem to be clear and works


eeeeee... this is a interesting way of making a focal point?

if a I wanted to make a painting of 2 things (me being stupid) I most likely would had made at least the 2 focal points in to separated shapes


iu_1388525_9920283.webp


and FUCK DEFAULT KRITA:

the default layout feels blotted to me, the color sampler and transform don't go back to the last tool that u where using once you are done using them ( if u apply a transform it means that I m done, same with the color one. It gets rly annoying to go back to the brush each time :/ )


this is a skill issue and i need to research more


TLDR

I always wanted to do a blog but never made it, so yea


any feedback is welcome, this is not the right way of doing stuff but the way I do it, I m still learning as I go :)


Tags:

2

Posted by churasko - November 30th, 2024


I really needed it to have the game out for my own sanity, I'll keep working on it anyway

I ll try to start posting more "finished" games from now on, working alone is hard, sr :/

iu_1310771_9920283.webp

so yeah, can't wait to die broke, with cirrhosis and paying alimony


2

Posted by churasko - October 2nd, 2024


iu_1278071_9920283.gif


It started as a funny cod zombies games for newgrounds and I keep going for stuff outside of the scope, now it barely run on browser.


Posted by churasko - October 18th, 2021


iu_449216_9920283.webp


1